
Creating a Flash Document
The first step in creating any Flash application is the creation of a Flash document. The great thing about a Flash document is it can contain text, audio, video, animations and other material including scripts that can either be included in the document or can be saved as external .AS files which can be linked to your Flash document.
From its early beginnings as an animation program Flash has extended its capabilities and reach to the point where it is able to deliver web content from a variety of sources. As such, Flash is able to create seven specific kinds of documents. They are:
- Flash Document: This is the most common Flash document you will create. The file extension used is “FLA” ( Rhymes with “Flahh”) and can incorporate content such as text and images , media assets such as audio and video files and, of course, the Actionscript code.
- Flash Slide Presentation.Think of a slide show with each slide in s separate Movie Clip and you will grasp the concept. Slides will not be presented in this book.
- Flash Form Application: Similar to slides but the form content - input boxes and so on-can be placed on separate slides. Again, this feature is based on Slides and, as such, will not be reviewed in this book.
- ActionScript file: Actionscript can be written to a separate document in Flash and can then be linked to a “FLA”. These files can also be created in a text editor or Dreamweaver MX 200x and use the .as extension.
- ActionScript Communication File: Traditionally used for media streamed into a Flash SWF file through the Flash Communication Server MX. These files can be created in Flash or a text editor, are placed on the Flash Communication Server and use the .asc extension.
- Flash JavaScript file: You can create a JavaScript file that create customized pop up windows from Flash, plug in detection and even control the width and height of the Flash movie from within the browser. These files use the .jsfl extension.
- Flash Project: Available only in Flash Professional 8, a project file allows you to create an index for grouping related files and managing version control. This is an excellent feature for use by project team.
- Download the Chapter 1 .zip file to your computer. Once you unzip the folder you can place it anywhere on your computer.
- Launch Flash Professional MX 2004.
The first thing you see is the start page. This is a standard page for many of Macromedia’s applications and, if you want to disable it, just click the “Don’t show again” check box in the bottom left corner of the Start Page. If you want to re-enable it, select Edit>Preferences and click the General tab. Select Show Start Page” and the Start page, shown below, will appear every time you start Flash.
- Select Create New>Flash Document on the start page to open the Flash Interface as shown in the following screen shot:
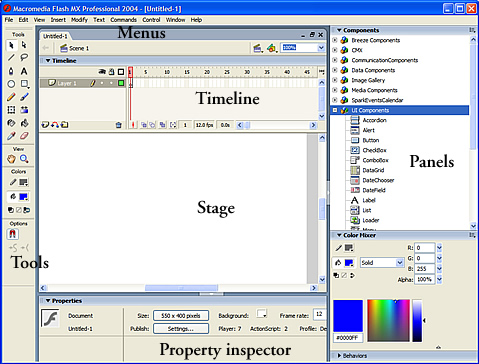
As you can see the interface is divided into a number of discreet areas:
- Main Menu: The main menu bar is the control centre for the Flash interface. Here you can manipulate your Flash files and customize your working environment.
- Stage: This is the area the user sees when the Flash movie is playing. It contains all of the visible and, in certain instances, invisible elements of the document such as text, images, video and sound.
- Timeline: The timeline contains the frames which compose a Flash movie or animation. Though Flash movies can have multiple frames, the exercises in the book will rarely require more than a single frame.
- Panels: Panels give you access to a broad range of authoring tools. The can be open, closed, rearranged and even grouped.
- Tools Panel: These are the drawing and text tools. When a tool is selected the Property Inspector will change to show the properties associated with the tool.
- Property inspector: The Property Inspector is actually a panel and it provides you with the opportunity to modify documents and objects. The Property Inspector, sometimes referred to as the “PI” is context sensitive meaning the properties on the PI will change to reflect those of the currently selected item. The Flash 8 Professional Property inspector is a bit different from its predecessors in that it a tabbed interface.
You can turn the Property Inspector on or off by pressing Control-F3 (PC) or Command-F3(Mac).You can also by some extra screen space by clicking the Timeline button in the upper left corner of the Timeline area. Click the button and the timeline disappears. Click it again and it reappears.
- In the Property Inspector, click the Size button. This will open the new Document Properties dialog box shown below.

Manipulating Panels
Your Flash authoring environment makes extensive use of a variety of panels which give you access to a number of tools ranging from aligning objects on the stage to writing ActionScript. The list of panels available to you can be found in the Window menu and they are divided into three distinct groupings:
- Design: A collection of panels that pertain to such design tasks as choosing colors to distorting objects on the stage.
- Development: A collection of panels used for such development tasks as writing ActionScript and debugging code.
- Other: These panels, ranging from Accessibility to Button libraries, affect the movie, as a whole.
Panels can be open- the panel’s contents are visible-, collapsed- only the panel name is visible- and closed- the panel can only be opened through the Window menu. As well, the position of open or collapsed panels can be changed and the panels can also be docked in a variety of locations on the screen including sets of panels that are docked with each other. The following screen shot shows a typical Flash interface with a variety of panel states and locations:

In this exercise you will move the panels and create a custom panel set.
- Open a new Flash document or use the file currently open..
- Select Window>Design Panels> Align.
The Align panel will appear to float over the stage.
The panel can actually be moved in one of two ways: you can click and drag the panel anywhere on the stage or you can dock the panel to any side of the interface. Whether the panels “docks” or just floats depends upon where the cursor is when you click and drag.
- Place the cursor over the dots beside the panel name.
These dots are called the “Gripper” and you will also notice that your cursor, if it is over the dots, changes to a compass cursor.
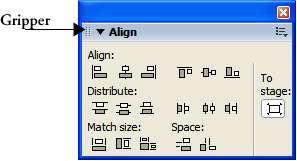
The dots and the cursor change are your visual clues that you can dock a panel.
- Place the cursor in the middle of the panel.
The cursor doesn’t change from the selection arrow. Again, this is a visual clue that tells you can move the panel but you can’t dock it.
- Dock the Align panel to the left edge of the screen by placing the cursor over the “Gripper”. Drag the panel to the left and, when you see a black box appear, as shown below, release the mouse.
- Save the file as LabComp.fla
The panel will now dock to the left edge of the stage area. To undock a panel, click and drag the panel onto the stage. When you release the panel will “float” over the stage.
Using the Tools Panel
The tools panel contains a number of tools used for creating text, vector graphics and manipulating the content on the stage. When you select a tool all of the properties associated with that tool will display in the Property Inspector. There are over 20 tools on the toolbar you will only be using many of them as you work your way through this book, The tools used in this chapter are the Text, Rectangle,Selection and Free Transform tools.
- Text Tool.

This is the tool used to add text to the stage. When you click on the stage with the text tool, the Property Inspector changes to let you adjust the width of the text, set the font, the size, alignment and color of the text. You can also choose whether the text is static, dynamic or entered by the user . - Selection Tool.

There are actually two selection tools. The solid arrow tool- Direct Selection- allows you to select entire objects or groups of objects. The other selection tool is the hollow arrow or; - Subselection tool.

As the name implies you can use this tool to select a part of an object. Regardless of which selection tool is chosen, once an object is selected, you can click and drag the selection from one side of the stage to the other or change its Properties, such as Fill color, in the Property Inspector. - Rectangle Tool:

Use this tool to draw squares and rectangles on the stage. - Free Transform Tool:

Use this tool to distort or resize a selected object on the stage. Depending upon the object selected , you can scale, rotate, skew and even flip an object.
You don’t have to select the tools, you can use the keyboard. To select the Direct Selection tool press the “V” key. To select the Subselect tool press the “A” key and to select the Free Transform Tool press the “Q” key. The key commands are located by placing the cursor over a tool. When the tool tip appears, the key command is the letter in the brackets.
 This work is licensed under a Creative Commons License.