Creating a Flash Document: Part 2
In this exercise you will construct a prototype for a Flash site. You will be importing images, adding text and generally getting comfortable with the Flash authoring environment.
- Open a new Flash document. Set the Background color to #989A68.
- Select File> Import>Import to Library.
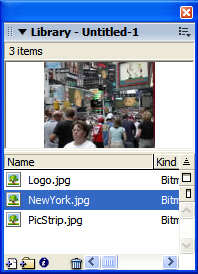
When the Import dialog box opens, navigate to the folder containi9ng the images, press the shift key and click on each of the three images in the folder to select them. Click the Open button and the dialog box will close.

- Select Window>Library or press Control-L (PC) or Command-L (Mac) to open the Library panel.
When the panel opens you will see the images you just imported. Importing content directly into the Library is a good habit to develop. The reason is importing to the stage will not only put a copy of the image on the stage but it, too, will appear in the Library. If the file is complex , importing to the stage does not allow you to control the layers where the images will be placed or where they are located on the stage. As well, importing to the Library allows you to have all of your content in one place and accessible to you when you need it.
- Drag a copy of the image from the Library and place it in the upper left corner of the stage. To ensure it is precisely placed, set the X and the Y values in the Property Inspector to 0.
The use of the Property inspector to precisely align objects on the stage is a good habit to develop. Attempting to do this using your eyes inevitably results in improper placement of objects on the stage.

- Double click the “Layer 1” name to select it and change the layer name to “Logo”.
Over the years Flash developers have learned to place all content in a separate layer and then naming the layer to reflect the content it contains. Adding layers does not increase the size of your Flash movie. Instead, layers give you a means of visually locating content on the stage. - Add a new layer and name it “Top”. Select the layer and then select the Rectangle tool. Draw a rectangle and, in the Property inspector set the width to 550 pixels, the height to 80 pixels and the X and Y coordinates to 0.
The first thing you will notice is the shape covers the logo and has stroke and fill colors. Drag this layer under the logo layer and the logo becomes visible.
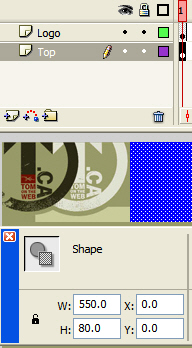
- Double click the rectangle on the stage and click the Stroke color chip in the Property inspector to open the Color Picker. Click the “No stroke” button- it has a red diagonal line- and the stroke will be removed.
- With the rectangle still selected, click the Fill Color chip on the Property inspector
to open the Color Picker. Place the cursor in the green color on the left side of the logo. Click the mouse
and the rectangle will fill with the selected color.
There are three ways of selecting a color in Flash. The first, if you have the Hex color value (#989A68), is to enter it directly into the Color Picker. The second is to click a color chip in the Color picker. The third is to select a color on the stage. - Save the file.

 This work is licensed under a Creative Commons License.