Week 4
Download the Lesson Files:
Week 1: The Freehand MX Interface
Click here to download the file.
In class exercise: The wrench.
Assignment- Create a simple personal geometric logo using circles, squares and lines. (10%)
Week 3- Functional design : Symbols and Instances:
Assignment: Using paper, create a linear drawing of your personal home page.(10%)
Week 4- Functional Design: Importing bitmaps into FreeHand MX
Download the zip or the sit files
Assignment: Create a comp of your personal Home Page in FreeHand MX (10%)
Assignment: Locate a logo that is particularly effective and be prepared to present it to the class.
Explain why it is so effective.
What message does it convey?
Are there any potential design issues involving its use in web media and what would
you do to resolve those issues. (5%)
Week 6- Dimensions of design: Logo creation in FreeHand
Assignment: Create a personal set of letters in FreeHand spelling out your last name. The largest inside square can be no more than ¼ of the full size letter and the maximum number of inside squares is 3.(10%)
Assignment: Create a personal typographic logo. (10%)
Week 9- Forms and Structure: Grid-based interface design.
Assignment: Using a 3 X 4 grid, design a balanced personal home page. (10%)
Week 10- Icons and Symbols: Developing iconic interfaces for use in web pages and mobile devices.
Assignment: Create an interface for a Palm Pilot email application. (10%)
Week 11/12- Colour
Assignment: Analyse a web site using the principals covered over the past 12 weeks and prepare to present them to your classmates. (25%)
Week 13,14,15- Critiques
Weeks 13 and 14 will be presentations of sites from weeks 11 and 12. Week 15 will be presentations of project work done in class.
The shapes you draw in FreeHand are composed of two elements- a vector path and a fill color. Once you make that distinction a world of creative possibilities open up to the web developer. There are five major filters that work with paths in Freehand. They are:
Divide
Intersect
Punch
Union
Envelope.
This tool is available either through the Xtra Operations tool bar or through the use of Modify,Combine, Divide. Essentially what this tool does is to use the bisecting path of the behind object to divide the front object. In this example start with a square and then draw a circle over the square.
A circle is drawn over a Freehand square.
Select both objects and either select Divide from the menu or click the Divide icon on the toolbar. When you do your circle essentially splits into two halves as shown:
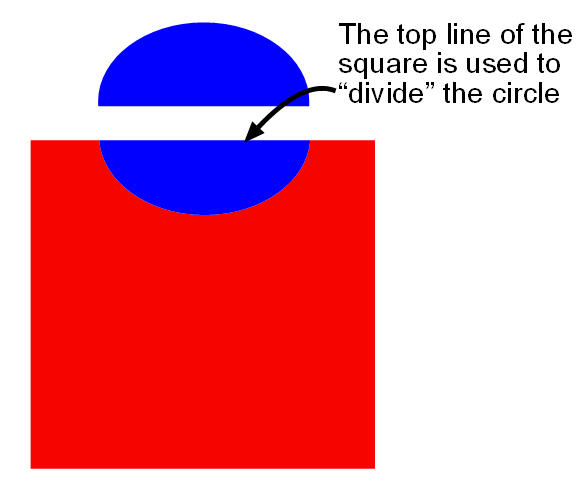
The circle is divided and, if you delete the bottom half, you will see that it has taken a chunk out of the square.
The intersect tool creates object from the areas where objects intersect as shown:
The Intersect Tool creates one shape from two shapes.
The Punch tool is rather interesting. Essentially think of it as functioning just like a Cookie Cutter. The foremost shape is punched through the underlying shape as shown:

The Union filter unites the shapes into one obkject. It also fills the result with the fill colour of the object in the background.
Envelope is one of those seriously cool tools that allows you to create some fascinating effects. Essentially, the tool can be regarded as a Free form distortion tool.
To use the tool create a shape on the page or type in your name. With the object or the text selected, select Modify, Envelope, Create.
When the handles appear around the selected object move them inwards or outwards and watch what happens. Here's my name after it has been enveloped.
Unlike Illustrator, Fireworks or Photoshop, Freehand does not contain a masking command or the ability to mask one object with another. Still there actually is a way of doing it that is not at all difficult. In this example I will be using a shape to mask a photograph.
1. Create a shape on the page and import an image to the page.
2. Select the image and select Edit, Cut.
3. Select the shape and select Edit, Paste Inside.
Warning:
If you need to mask something, this isn't the application for the task. Use the masking feature of Fireworks MX instead. If you need a funky mask like the one shown, create it in Freehand MX and bring it into Fireworks MX.
This technique builds upon what I have demonstrated and shows you don't necessarily have to possess the drawing skills of Da Vinci to create some rather amazing images. In this exercise we are going to use the masking feature and Autotrace to create a rather fascinating vector drawing.
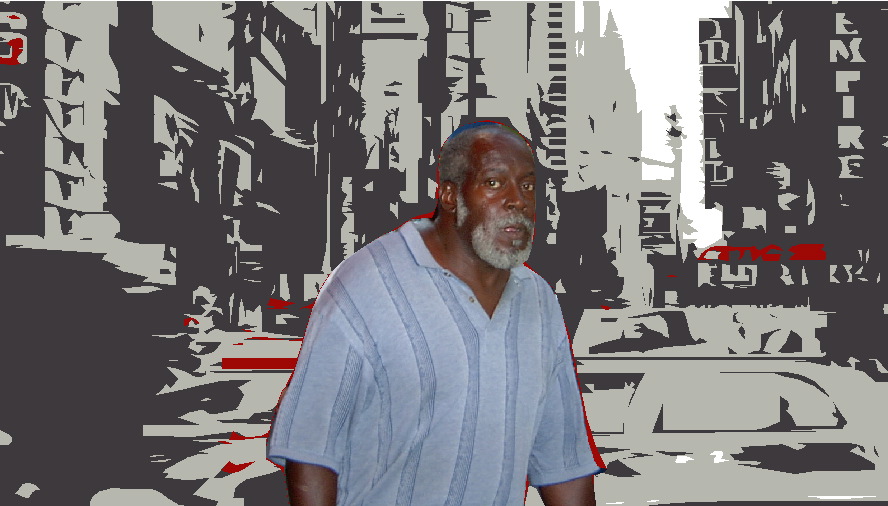
We start with two Photographs taken in New York City . One is this rather interesting Stare Down on 42'nd street and the second is the intersection 42'nd Street and 8' th Avenue .

Stare

42 nd
1. Open a new Freehand document. Add three layers and import the stare photo into the Foreground layer. Name the layer, Stare, and lock the layer. Name layer 2, Outline.
2. Select layer 2. Select the Pen Tool and draw an object that follows the outline of the gentleman in the photograph. Use the Bezigon tool to add points to your drawing if you need to follow the curves in the shirt and so on.
3. Select the shape you just drew and fill it with a solid colour. Remove the stroke.
4. Lock the Outline layer. Unlock the Stare Layer, select the image and delete it.
5. Import the FortySecond.jpg image into the Stare layer. Resize the image and position it behind the Outline in order to give yourself an interesting composition.
6. Double click the Trace tool and, when the dialog box opens, set the number of
colours to 8
3. Click OK to close the Dialog box.
7. Lock the Stare Layer and drag Layer 2, in the Layer palette, under the Outline layer. With the Trace Tool selected, drag from the upper left corner of the image to the bottom right corner of the image. When you release the mouse, the image takes on an eerie feel.
If you really want to go to town, use the outline of the gentleman as a mask. Then trace the street image.