Week 6: Programmatic Sound Control ... Part One
Before you actually create a full bore project using sound control it is important to understand the fundamentals. In this exercise we will be creating a small controller that turns sound on and off, adjusts the volume and pans the sound across channels. The controllers that make all of this possible are already "pre packaged" with Flash. All you have to do is to "wire them up."
Getting Started
- Open a new Flash document.
- Set the stage size to 90 pixels wide by 325 pixels high and set the stage colour to #666666.
- Add two layers to the timeline. Name them:
- Actions
- Buttons
- Sliders
- Select Window>Other Panels>Common Libraries> Buttons.
- Open the Knobs and Faders folder.
- Drag a copy of the "fader-gain" symbol and the "knob-pan" symbol to the "Sliders" layer.
- Select the "Buttons" layer and open the Playback buttons folder in the Library.
- Drag copies of the "playback-play" and "playback-stop" buttons to the stage.
- Save the document to your project folder containing the sound file used in this exercise.
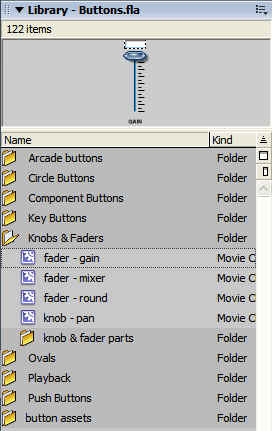
Figure 1: Flash contains a rather extensive range of controls and buttons for your Flash projects. They are ideal for prototyping a project.
Preparing for Sound Playback
If you closely examine the Gain slider it really doesn't state its purpose. It really should say "Volume". The same thing applies to the "Start" and the "Stop" buttons. They really should state their purpose.
- Open the Library and open the "knob and fader parts" folder in your Library.
- Double click the "gain details" movie clip to open it.
- Select the Text tool and click once on the text in the open movie clip.
- Select the Text and change it to "Volume". Set the font to Arial, 10 points, bold.
- Return to the main timeline by clicking the "Scene 1" button.
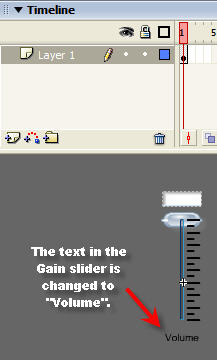
Image 2: Change the text in the slider movie clip.
"Wiring it up" for sound playback
With the assets in place you can now concentrate on having the objects do what they were designed to do: Control a sound.
- Select the actions layer and open the Actionscript Editor.
- Enter the following code:
var dynamic_sound:Sound= new Sound();
dynamic_sound.loadSound("Satin Doll.mp3" , false);
dynamic_sound.onLoad = function() {
dynamic_sound.stop();
}
This code is rather easy to follow:
-
Create a sound object named "dynamic_sound": new Sound().
-
Load the sound- Satin Doll.mp3-into the object from the server and don't stream it just yet - false.
-
Create a function that makes sure the sound doesn't play when the Flash movie loads- stop().
With sound object created, we can now concentrate on "tying" it to the "Pan" and "Volume" sliders.
- Double click the Volume slider to open the slider's Movie Clip.
- Notice the code attached to Frame 4. Select the frame and open the Actionscript editor.
The code for the slider is "pre written". What needs to be done is to connect the slider to the sound object.
- Scroll down to the bottom of the code.
- Select the last line of code:
sound.setVolume(level);
- Connect the slider to the sound object by changing the line to:
_root.dynamic_sound.setVolume(level);
With the volume slider connected to the "Satin Doll" sound, we can now connect the Pan control to the sound as well.
- Return to the main timeline and double click the Pan movie clip to open the movie clip.
- Open the Actionscript and change the last line of the code:
sound.setPan(level);
to:
_root.dynamic_sound.setPan(level);
- Return to the main timeline.
Now that the Pan knob and the Volume slider are "wired up" you can now concentrate on on the Play and Stop buttons. All they do is start the sound-Play- and turn it off- Stop. Here's how:
- Select the Play button on the stage and give it the instance name of "play_btn".
- Open the Actionscript in the Actions layer and add the following code to the script:
play_btn.onRelease = function() {
dynamic_sound.start(0,1);
}
The important concept here is :
dynamic_sound.start(0,1);
This essentially says start the object right at the beginning of the sound-0- and loop it once- 1. The first parameter is an offset value, measured in seconds. For example, if you wanted to start the sound one minute into the track then the offset value would be 60. If you wanted to loop the sound three times and then finish, the value for the second parameter would be 3.
- Select the "stop" button on the stage and give it the instance name of "stop_btn".
- Open the Actionscript in the Actions layer and enter the following code:
stop_btn.onRelease = function() {
dynamic_sound.stop();
}
- Save and test the movie.
The code:
This is the code that should be in the Actions layer:
var dynamic_sound:Sound= new Sound();
dynamic_sound.loadSound("Satin Doll.mp3" , false);
dynamic_sound.onLoad = function() {
dynamic_sound.stop();
}
play_btn.onRelease = function() {
dynamic_sound.start(0,1);
}
stop_btn.onRelease = function() {
dynamic_sound.stop();
}
![]()
This work is licensed under a Creative Commons License.
