Week 9: Building a Video Player using a Video Object
If you really want to get creative with video, you have to understand that using the Components or embedding video into your Flash movie just isn't going to work. The components already have a built in interface and embedding simply bloats the .SWF.
Instead you need to use a Video Object.
A video object is a small Embedded Video object dragged onto the stage from the Library. Once it is there, it is a succinct four-step process to feed a video signal into it:
-
Instantiate the object
-
Open a Net Connection
-
Open a Net Stream
-
Feed the video stream into the object by attaching the video to the object.
If you follow those four steps, in the order presented, you will be able stream video into your web page from your web server.
In this tutorial I demonstrate how I constructed this video player:
Getting started
Before I went to work, I had to deal with a couple of issues:
-
A streaming video will start immediately and play straight through until it finishes. This means the user has no control over the process. It was important, therefore, to add a button that, when clicked, starts the video playing.
-
I wanted the user be be able to pause the video during playback and then restart the playback.
-
The video had to look like it was embedded into the web page. This meant the Flash stage color had to match the color of the area in which it was sitting.
-
Dropped frames can be a pain. If frames are dropped, the video stutters.To avoid this situation, I needed to figure out how to store the video in memory but still have immediate playback when the Play button is clicked.
As we progress through this tutorial you will see how I dealt with each of these issues.
- Open a new Flash document.
- Change the stage properties to these values:
- Width= 320
- Height= 275
- Stage Color = #CCCCa
- Select Window>Other Panels>Common Libraries> Buttons. This will open the buttons library in Flash.
- Open the Circle Buttons folder and drag a copy of the "Start" and the "Stop" buttons to the stage.
You don't have to use the buttons that are packaged with Flash. You can build your own custom buttons in Freehand MX, Fireworks MX 2004 or in Flash.
The text on the buttons is "lost" against the background color. Here's how I fixed that:
- Double click the Stop button on the stage to open the Button Symbol editor.
- Select the Text Tool and select the text in the "Up" frame of the button.
- Enter the following text: "pause/restart".
- In the Property Inspector, change the text colour to #666666.
- Select the Over frame and change the text to "pause/restart". Do this for the "Down" frame as well.
- Click the Scene 1 button to return to the main timeline.
- Double click the Start button and change it using Steps 1 to 5. Change the text to read "play from beginning".
- Save the file.

Image 1 : Change the text and text colour to contrast it from the background.
Adding the Video Object:
- Move the buttons to the bottom of the stage.
- Open the Library panel and from the Panel Options pop down, select "New Video".A new item, named "Embedded Video" will appear in your Library.
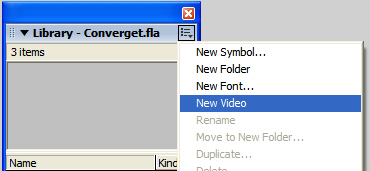
Image 2: Select "New Video" from the Panel options to add a Video Object to your movie.
- Drag the video object from the Library to the stage. You will see a box with a big "X" through it.
- Select the object on the stage and, using the Property Inspector, set its X and Y coordinates to 0 and set the dimensions to 320 X 240.
- If your stage resembles that shown in Image 3, save the file.
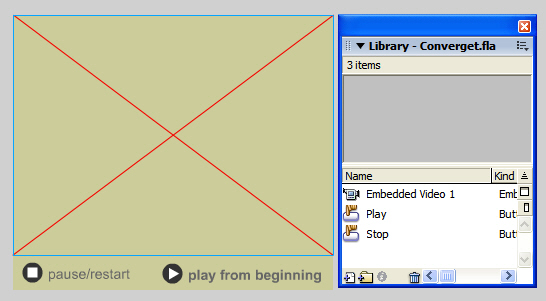
Image 3: The Embedded Video is indicated by the big red "X" on the stage.
Wiring it up
With the interface constructed it is now a simple matter of writing the Actionscript that makes it work. Remember the "Order of Battle":
-
Connect
-
Stream
-
Load
Think of a video stream as functioning like cable television. The cable in your TV is how you connect to your cable provider.When you connect the cable to the TV, the connection is established and the signal moves or "streams" from from the cable company into the cable connected to your TV. When you turn on the TV, the program currently playing on the selected channel is "loaded" into the TV and appears on the screen. Turn the TV off, and the signal simply sits in the cable waiting to be "loaded" back into the TV.
The "Play" button will function much like the On switch. The "Pause" button will simply "pause" the stream and hold the movie until the button is clicked again.
Follow these steps to stream a video from your Web server into a Flash movie:
- Add a new layer to your movie and name it "Actions".
- Select the Video object on the stage and give it the instance name of "myVid".
- Select the Pause button on the stage and give it the instance name of "stop_btn".
- Select the Play button on the stage and give it the instance name of "play_btn".
- Select Frame one of the Actions layer and press the F9 key to open the Actionscript editor.
- Enter the following line of code:
myNC = new NetConnection();
This single line of code opens the connection between the .swf and your server.
- Press the Enter key and enter the following line of code:
myNC.connect(null);
This line keeps the connection between the .swf and your server open.
- Press the Enter key and enter the following line of code:
myStream= new NetStream(myNC);
This line of code creates the stream through the connection and names it "myStream".
- Press the Enter key and enter the following line of code:
myStream.setBufferTime(2);
This line deals with the "stuttering" issue. Using the setBufferTime() property tells Flash to place two seconds of the stream into a buffer.The default value is 0 which means there is no buffer in place.
- Press the Enter key and enter the following line of code:
myVid.attachVideo(myStream);
The attachVideo() method links the embedded video object on the stage with the stream from your web server.
- Press the Enter key and enter the following line of code:
myStream.pause();
I don't want the video to start playing immediately. This is the purpose of this line of code. The initial value for this event is false and the video plays. When it is called the value will change to true and the video will pause.
The interesting thing about this method is that it has dual states. If it is used, the video stream will pause. If the stream is paused and it is used again, the video will start to play. This is handy to know when coding the buttons.
- Press the Enter key and enter the following code:
stop_btn.onRelease = function() {
myStream.pause();
}
This function essentially turns the Pause button into a toggle switch. The video is already paused, so clicking it will set the pause value to "false" and the video will start to play.
- Press the Enter key and enter the following line of code:
play_btn.onRelease = function(){
myStream.play("Converge01.flv");
}
It is critical that you understand the "play" method. This is the line that actually finds the video (Converge01.flv)on your web server, attaches it to the stream and starts the video playing. If it isn't there, the video will not play!
- Check the syntax and close the Actions window.
- Save the file.
Finishing up
With the code written you now have to make sure that everything is where it belongs and that the .swf is pointing to the right files before you upload the file to your web server.
- Create a directory (folder) in your site's root.
- Put the .flv file you will be using in that folder.
- Return to Flash and select File>Publish Settings.
- When the Publish Settings dialog box opens, deselect the HTML option.
- Make sure "Flash(.swf)" is selected and click the browse button to open the Set Publish Destination dialog box.
- Navigate to the folder on your site containing the .FLV file.
- Enter a name for the file and click the Save button to close the dialog box.
- Click Publish.
- Save the .fla and quit Flash.
- Open Dreamweaver, create a new page and insert the Flash .swf just created into the Dreamweaver page.
- Save the Dreamweaver page to the same folder as the .swf and the .flv.
- Upload the folder to your server.

Image 4: The Dreamweaver page, the .swf and the .flv are all located in the same directory and that directory is uploaded to the server.
The Code:
myNC= new NetConnection();
myNC.connect(null);
myStream= new NetStream(myNC);
myStream.setBufferTime(2);
myVid.attachVideo(myStream);
myStream.pause();
stop_btn.onRelease= function(){
myStream.pause();
}
play_btn.onRelease= function(){
myStream.play("Converge01.flv");
}
